Pages

Sunday, September 1, 2013

How to Become Your Own Boss


If you want to start a business but don't know where to start, don't worry--you are not alone. In fact, given the new economic reality of our time, more people than ever before have found the "job" they thought was waiting for them doesn't exist. Others have come to the conclusion that they would rather create work they love, constructed to fit with their own life goals. No matter what the motivation is to be your own boss, you can start today.

Here are 8 Tips to Get You Started:
  1. Take a Stand for Yourself.
    If you are dissatisfied with your current circumstances, admit that no one can fix them except for you. It doesn't do any good to blame the economy, your boss, your spouse or your family. Change can only occur when you make a conscious decision to make it happen.

    <insert ad here>
  2. Identify the Right Business for You.
    Give yourself permission to explore. Be willing to look at different facets of yourself (your personality, social styles, age) and listen to your intuition. We tend to ignore intuition even though deep down we often know the truth. Ask yourself "What gives me energy even when I'm tired?"

    How do you know what business is "right" for you? There are three common approaches to entrepreneurship:

    Do What You Know: Have you been laid off or want a change? Look at work you have done for others in the past and think about how you could package those skills and offer them as your own services or products.

    Do What Others Do: Learn about other businesses that interest you. Once you have identified a business you like, emulate it.

    Solve a Common Problem: Is there a gap in the market? Is there a service or product you would like to bring to market? (Note: This is the highest-risk of the three approaches.) If you choose to do this, make sure that you become a student and gain knowledge first before you spend any money.
     
  3. Business Planning Improves Your Chances for Success.
    Most people don't plan, but it will help you get to market faster. A business plan will help you gain clarity, focus and confidence. A plan does not need to be more than one page. As you write down your goals, strategies and action steps, your business becomes real.

    Ask yourself the following questions:
     - What am I building?
    - Who will I serve?
    - What is the promise I am making to my customers/clients and to myself?
    - What are my objectives, strategies and action plans (steps) to achieve my goals?
     
  4. Know Your Target Audience Before You Spend a Penny.
    Before you spend money, find out if people will actually buy your products or services. This may be the most important thing you do. You can do this by validating your market. In other words, who, exactly, will buy your products or services other than your family or friends? (And don't say. "Everyone in America will want my product." Trust me--they won't.) What is the size of your target market? Who are your customers? Is your product or service relevant to their everyday life? Why do they need it?

    There is industry research available that you can uncover for free. Read industry articles with data (Google the relevant industry associations) and read Census data to learn more. However, the most important way to get this information is to ask your target market/customers directly and then listen.
  5. Understand Your Personal Finances and Choose the Right Kind of Money You Need for Your Business.
    As an entrepreneur, your personal life and business life are interconnected. You are likely to be your first--and possibly only--investor. Therefore, having a detailed understanding of your personal finances, and the ability to track them, is an essential first step before seeking outside funding for your business. This is why I recommend setting up your personal accounts in a money management system such as Mint.com to simplify this process.

    As you are creating your business plan, you will need to consider what type of business you are building--a lifestyle business (smaller amount of startup funds), a franchise (moderate investment depending on the franchise), or a high-tech business (will require significant capital investment). Depending on where you fall on the continuum, you will need a different amount of money to launch and grow your business, and it does matter what kind of money you accept.
     
  6. Build a Support Network.
    You've made the internal commitment to your business. Now you need to cultivate a network of supporters, advisors, partners, allies and vendors. If you believe in your business, others will, too.

    Network locally, nationally & via social networks. Join networks like NAPW.com, your local chamber of commerce, or other relevant business groups. Here are some networking basics:

    - When attending networking events, ask others what they do and think about how you can help them. The key is to listen more than tout yourself.
    - No matter what group you join, be generous, help others and make introductions without charging them.
    - By becoming a generous leader, you will be the first person that comes to mind when someone you've helped needs your service or hears of someone else who needs your service.
  7. Sell By Creating Value.
    Even though we purchase products and services every day, people don't want to be "sold." Focus on serving others. The more people you serve, the more money you will make. When considering your customers or clients, ask yourself:

    - What can I give them?
    - How can I make them successful in their own pursuits?
    - This approach can help lead you to new ways to hone your product or service and deliver more value, which your customers will appreciate.
  8. Get the Word Out.
    Be willing to say who you are and what you do with conviction and without apology. Embrace and use the most effective online tools (Twitter, Facebook, YouTube, LinkedIn) available to broadcast your news. Use social networks as "pointer" sites; i.e., to point to anything you think will be of interest to your fans and followers.

    Even though social networks are essential today (you must use them!), don't underestimate the power of other methods to get the word out: e.g., word-of-mouth marketing, website and internet marketing tools, public relations, blog posts, columns and articles, speeches, e-mail, newsletters, and the old-fashioned but still essential telephone.

    If you take these steps, you'll be well on your way to becoming your own boss. It's important to remember that you are not alone. If you want to "be your own boss" but you still feel stuck, reach out and connect with other entrepreneurs in a variety of ways. You may be surprised by the invaluable contacts that are right at your fingertips.

10 SEO Blog Post Publishing Steps that Most Bloggers Forget

10 SEO Blog Post Publishing Steps that Most Bloggers Forget


Here are 10 of the most popular SEO blog post publishing steps that bloggers tend to forget.

1. Keyword Research

Before I write a single word, I figure out if it’s something that people are asking about. And if they are, I want to know if the internet is already saturated with that type of content.
To figure this out, I do two things:
  1. Google’s Keyword Tool – I look up the words I believe people would search for to find the post I plan on writing.
  2. Google – I google those keywords to see the actual competition.
By now, I can look at a series of search results and determine how well I’ll be able to rank for a keyword.
I want this post to rank for “seo blog post publishing steps” (click to see how it’s doing).
For more clarification on this tip, read this comment below.

2. Fine-Tuning the Headline

Here’s my formula for crafting headlines for list posts:
[#][keyword][ curiosity-capturing phrase]
For title tag SEO, your goal is to place the keyword as near to the front of the headline as possible:
  • Top 10 Motivational YouTube Videos for Entrepreneurs
  • 20 Great Google Chrome Extensions for Online Entrepreneurs
  • 20 Best Designed Pricing Comparison Tables
For that last one, I switched the keyword with the curiosity phrase because “Best Designed” was another phrase that people tack on to the base keyword.

3. Post Slug

The post slug is what shows up after the domain for every post or page.
When you type a headline, WordPress generates the post slug by placing every word in the headline into the slug. This clutters it up with lots of small words.
Instead, change your post slug to your primary keyword.
Default: IncomeDiary.com/10-seo-blog-post-publishing-steps-that-most-bloggers-forget/
Ideal: IncomeDiary.com/seo-blog-post-publishing-steps/

4. Images

We all know that images grab your attention, break up the content, and supplement your ideas. But they also add great SEO benefits, as long as you follow these steps:
  1. Save your images as [keyword-phrase.png] before you upload them to your site.
  2. Add alt text as [keyword phrase].
  3. Add title tag as [keyword phrase].
These rules apply to your featured image and the images within your posts. For the images within the content, however, use other similar and relevant keywords.

5. Relevant Videos

Google understands that adding a video to a blog post makes it a more complete resource. If they haven’t already boosting blog posts with videos, they will eventually.
If blogging is a big portion of your business, start making videos for your posts, upload them to your channel, and embed them in the actual post.
If you’re still dabbling in blogging, consider embedding other peoples’ videos in your posts.

6. Subheads

Similar to images, subheadings break up the content and make blog posts easier to read. They also have big-time SEO benefits.
When a search engine robot hits a page, it reads the headline/title tag first. Then it reads the H2, H3, and H4 tags.
When you add subheadings to your content, proper HTML is:
<h2>Subhead Level 1</h2>
<h3>Subhead Level 2</h3>
<h4>Subhead Level 3</h3>
Note: The headline/title tag should be automatically wrapped in <h1></h1>.
So… Stop simply bolding and italicizing your subheads.

7. Interlinking

Another important step that most people forget is interlinking between posts.
Before you publish a new post, read through it and try to find two-three opportunities to naturally link back to relevant posts on your blog.
This keeps both readers and search spiders on your site longer.

8. External Linking

Also, look for opportunities to link to other bloggers. The SEO benefits of external linking are unclear, but Neil Patel says:
“Did you know that an external links going out to these high authority sites can boost your SEO? When search engines crawl your site and see a link and follow it to CNN or Huffington Post, they weight it as a positive. The trick is to find organic ways to link to these sites, like I did in this post.”
Linking to other sites is also a good way to build relationships with other bloggers.
I’ve received two “thank you” emails from important people because I chose to link to their sites on IncomeDiary posts.
Pat Flynn Email
I linked to Pat’s site on: 10 Blog Posts that Made an Everlasting Impact on Me
Giancarlo Massaro Email
I linked to Giancarlo’s site on: 10 Weird Ways Big Companies Make Money Online
Bloggers notice and appreciate backlinks.

9. Meta Data

Whether or not Google still looks at meta keywords is up for debate, but the meta description is definitely still used.
In a search result, your meta description often shows up as the little blurb beneath the blue link. In writing your meta description, you need to keep three things in mind:
  1. It needs to be fewer than 155 characters so Google will display the whole description.
  2. It needs to include your keywords because Google bolds them in search results.
  3. It should be an actual sentence from the post because people look for that sentence once they arrive.
I always summarize the post with the keywords in the last sentence of the introduction and use that as the meta description.

10. Call to Action

The final step is the call-to-action. As with any piece of marketing material, a blog post should be designed to get someone to do something.
Here are a few popular calls to action:
  1. Comment – You can encourage people to comment by ending the post with a thought-provoking question or simply asking them to let you know what they think.
  2. Share – “If you liked this post, tweet it out.”
  3. Implement – I believe the best result of any blog post is for a reader to take your advice and implement it.
The main reason I’ve been following IncomeDiary for so long is because I constantly find myself implementing Michael’s advice. When I see the benefits to following his advice, it makes me want to come back for more.

Ultimate Step-by-Step Guide to Writing a Blog Post


Ultimate Step-by-Step Guide to Writing a Blog Post


Step 1: Researching (1 Hour)

Start with a topic. For instance, the topic of this post is, “blog post writing process.”
Then, before I write a single word, I do about an hour of research:

Conduct Keyword Research

Once you have a topic, focus on nailing it down into a high search, low competition keyword. I use the Google Keyword Tool.
Take the topic and turn it into a keyword because you want the post to rank for the keyword that people actually use, instead of your best guess. Also, find a low competition keyword so you have a better chance of ranking for it.
When I started researching this post, I checked “blog post blueprint,” “how to write a blog post,” and “steps blog post.” Through that, I found that “writing a blog post” is another good keyword for this topic.
Keyword Tool Writing Blog Posts

Research the Keyword

Once you have a few good keywords, google them.
  1. To see the actual results.
    It’s good to see the headlines and metadata for the posts that sit on the front page so you can improve upon them.
  2. To read what others have written.
    Your goal with a blog post is to create an ultimate resource for that longtail keyword. The best way to incorporate various viewpoints on your topic is to draw inspiration from what other people have already written. If I use someone’s exact thought, I’ll link to it like I did in this post.
After googling the four keywords for this post and reading through a few of the articles (most of them weren’t very good), I decided on my primary and secondary keywords for this post.
Primary: Step-by-Step Guide Writing Blog Post
Secondary: Writing a Blog Post, Steps Writing Blog Post, Guide Writing Blog Post
(Click the links to see how this post is doing in the real-time search results.)
I chose not to write for, “how to write a blog post” because, despite the Keyword Tool listing it as low competition, there are a number of articles already written for that exact keyword. I found, however, that no one has written a step-by-step guide for writing blog posts.

Step 2: Brainstorming and Structuring (30 Minutes)

The first step in my brainstorming process is to craft the headline based on the primary and secondary keywords.
As you see, all of the primary and secondary keywords are worked into the headline/title tag:
A Step-By-Step Guide to Writing a Traffic-Nabbing Blog Post
I start with the headline because that gives me a scope for the content of the article.

Develop Your Subheads

With the headline nailed down, you can start structuring the blog post with subheads. Include first level and second level subheads depending on how in depth you want to be.
The first level subheads in this post are the steps, and the second level subheads act as quick scans so you can grasp the section without reading it all.
Remember, use the HTML heading tags for the subheads as I explained in 10 SEO Blog Post Publishing Steps that Most Bloggers Forget.

Step 3: Writing (3 Hours)

Out of the six hours that it takes me to create a blog post, I only spend half of it writing.

Reel Them in With the Introduction

After the headline, your introduction is the most important part of the post.
If you do a good job of capturing their attention and emphasizing the importance of reading the post, they’ll keep reading. If you don’t, they won’t.
In this post, I emphasized the importance of reading it by ending the introduction with the benefits of following this process, “tens of thousands of people every month.”

Fill Out the Subhead Sections

By writing the subheads first, writing the article becomes as simple as filling out a form with explanatory content under each subhead.
When rounding out the subhead sections, I try to include an image, a blockquote, or a list to make each section more scannable.

Wrap it Up with a Conclusion

The purpose of the conclusion is three-fold:
  1. To re-emphasize the main points of the post.
    What do you want them to remember? How do you want them to feel?
  2. To tie back in with the introduction.
    If you dropped something creative into the introduction, bring the post full circle by mentioning it again.
  3. To get them to take action.
    I’m convinced that the best call to action is to get your reader to implement your advice. So end the post with a little ditty that’ll motivate them to do so (e.g see “The Final Word” ).

Edit for Content

At this point, read through the whole article to grasp the big picture view of the content. Make sure that it effectively communicates the message that you want your reader to take away.
You’ll edit for grammar and sentence structure later.

Step 4: Posting (30 Minutes)

Now that you’ve written the post, preferably in Word, upload it to your site in the Add Post area.
In posting the article, there are five things to keep in mind:
  1. Metadata
    Based on your keyword research, add your meta description and keywords.
  2. Category
    Choose a category for your post.
  3. Tags
    Add tags to link to previous posts on your blog that discuss similar topics.
  4. Excerpt
    If you use excerpts in your theme, make sure you drop that in. I like to use my meta description as my excerpt.
  5. Custom Fields
    If you have custom fields built into your theme, include those.

Step 5: Editing and Accessorizing (1 Hour)

Now that you have the post on your site, we start the editing and accessorizing step:
  1. Edit for Grammar
    Click Preview to edit the post as you’ll see it on your site. For this editing phase, focus on grammatical errors, spelling mistakes, and syntax issues.
  2. Find a Post Image
    Use Compfight.com to search through the Creative Commons section of Flickr. Find a photo you like, make sure you’re not violating any of its copyright rules, use it in your post, and attribute it back to the creator. If it’s your feature image, set it as your feature image.
  3. Create the Supplementary Images
    In Step 1, I included a supplementary screenshot of the Google Keyword results for my initial keywords. I create those images at this point and upload them into the post.
  4. Link Internally and Externally
    Link to two or three previous posts because it’s good for internal SEO and for keeping people on your site. Then, if I feel like the reader will benefit from someone else’s resource or tool (like Compfight), I’ll link to those.
  5. Make Final Edits
    Edit the post one last time with all of the images included.
Refer back to 10 SEO Blog Post Publishing Steps that Most Bloggers Forget to make sure you don’t forget anything in these two steps.
Then read 10 Blog Post Marketing Steps to Take Immediately After You Publish to know what comes next.


10 Blog Post Marketing Steps to Take Immediately After You Publish


10 Blog Post Marketing Steps to Take Immediately After You Publish


1. Schedule Instead of Publish

I always schedule rather than publish because scheduling gives me one last chance to look over the post.
I also schedule my posts to be published at midnight for three reasons:
  1. So the published on time is 00:00. I’m a little OCD about it.
  2. So it has the maximum number of hours with the current date.
  3. So it has a few “live-hours” before Feedburner/Aweber emails out between 7am-9am. This gives it a chance to have a few Tweets, Likes and comments before it gets emailed out.

2. Read it Again

Immediately after your post is published, read it again. You should’ve already looked it over for grammar. Now is the time to look for ways to improve the final post.
If you don’t enjoy spending a few minutes reading your post one last time, then you probably didn’t do a very good job of writing it.
It’s like fixing up an old car. Once it’s complete, if you don’t spend at least a few minutes admiring it, then you know you could’ve done better.

3. Tweet it Out

Simple enough, eh?
I don’t use any auto-tweeting tools because I like to adjust the tweet and I like to be able to say, “hey world… I just now finished this post. Come be one of the first to see it.”

4. Share on Facebook

Facebook, on the other hand, is a bit more strategic.
When you publish your blog posts on your personal profile, understand that those people are primarily your friends and family. They probably don’t care too much about the content of the post but they will be interested in the fact that you wrote it. So when you add the comment to the link, include something a bit more personal.
When you post your link on your Facebook page, know that these are people who have “Liked” your blog/brand/company. So here, add a comment mentioning the benefit of taking a few minutes to read the post.
It’s important to share the article on both your personal profile and Facebook page at the same time because people who follow both are more likely to see it. It’s the same reason you’re starting to see the links that multiple friends recommend.

5. Set Up Automatic Pinging

If you’re unfamiliar with pinging, there are a number of sites and platforms (including Google, Yahoo!, and Technorati) that allow you to automatically notify, or “ping,” them when your site is updated with new content.
If you’re using WordPress, it’s easy to set up.
From your WordPress dashboard, go to Settings > Writing and scroll down to Update Services.
In that box, copy and paste these URLs:
http://rpc.pingomatic.com/
http://blogsearch.google.com/ping/RPC2
http://api.moreover.com/RPC2
http://api.my.yahoo.com/RPC2
http://rpc.technorati.com/rpc/ping
http://rpc.twingly.com/
http://rpc.weblogs.com/RPC2
http://www.blogdigger.com/RPC2
http://www.bloglines.com/ping
http://ping.feedburner.com/
http://rpc.icerocket.com:10080/
http://www.octora.com/add_rss.php
http://ping.syndic8.com/xmlrpc.php
http://www.wasalive.com/ping/
http://ping.weblogalot.com/rpc.php
http://www.blogpeople.net/servlet/weblogUpdates
http://ping.myblog.jp
http://ping.bloggers.jp/rpc/
http://bblog.com/ping.php
I’ve gathered this collection of pinging services over the last three years. Let me know if I’m missing any.

6. Email Broadcast

Assuming you’ve started to build your email list, email out your blog post to people who have signed up for your blog updates.
You can simply write up and send out an email with a short introduction and link to the post.
Or, depending on your email marketing service, you can automate this step.
I use Aweber’s Blog Broadcast function and integrate it with Feedburner. This way, every time I update my blog, my list automatically gets an email with the blog post between the hours of 7am-9am. I chose that time so it’s sitting at the top of their inbox when they start their computer in the morning.
If you’d like to know how to set up the Aweber Blog Broadcast function, let me know in the comments.

7. Link from Old Posts

Last week I talked about interlinking by adding links to old posts before you publish a new post. You can also do the opposite.
If you’re doing a good job of optimizing and writing evergreen content, then your old posts will continue to get traffic. An easy way to get traffic to a brand new post is to dig into your archives and link from a few relevant posts to the new post with the keyword as the anchor text.
It counts as a link and a trackback. If you’re struggling to get that first comment, consider doing this because the default settings in WordPress count trackbacks as comments. I’ve found that people are more likely to comment if they see other comments.

8. Link from Other Sites

About a year ago I was considering starting a new blog by taking an existing blog and putting it on a new domain. I asked Michael for his opinion and he told me that it’s nice to have two high-traffic sites (his being IncomeDiary.com and Retireat21.com).
One reason that it’s nice to have multiple sites is that you can link between them.
Whenever I publish a post on my new blog, I search the archives of my old blog for relevant articles until I find at least one chance to link to the new blog post.
This adds a trackback, adds a link, increases traffic, and strengthens the structure of my mini network of sites.

9. Submit it to Article Directories

If you’re serious about blogging and would like to boost your SEO, consider submitting your posts to article directories.
Here’s the process:
  1. Rewrite your post so it’s new content.
  2. Submit it to a few article directories (EzineArticles, ArticlesBase, GoArticles, and ArticleDashboard).
  3. Include a link back to the original article or one of your article directory articles.
This process takes awhile so it doesn’t make sense to do it for every post. Once a post starts getting a fair amount of search traffic, consider going through this process to boost it even higher.

10. Reply to First Comment

The first comment is the hardest to get, unless you have a site like IncomeDiary. So you want to reward that commenter by replying to their comment as soon as you can. This does two things:
  1. Rewards the first commenter.
  2. Shows other commenters that you listen which encourages them to leave comments as well.
For me, I choose to reply to almost every comment simply because I like answering questions and interacting with smart people. It takes a fair amount of time, but I enjoy your comments.
If this post helped you at all or taught you something new, I’d like to know. Leave a comment below and you’ll likely see my reply within a day.

How to Measure Your Blog’s Growth

How to Measure Your Blog’s Growth


While no one wants to get bogged down by statistics and analysis, it is still important to monitor your blog’s growth from all angles. Keeping track of your blog’s progress is important to see if your current strategies are working or are in need of an update.
In this post, you will learn what numbers you will want to keep track of, and the free tools you can use to get these numbers.

Blog Statistics and Analysis

The following are important statistics to keep track of for your blog and related social media outlets to analyze the ongoing progress of your blogging and digital marketing efforts. I would suggest recording these statistics once a month within a spreadsheet.
RSS and Mailing List Subscribers – One thing every blogger wants is subscribers, and the change in your number of subscribers shows whether your recent content has been resonating with your audience. If you haven’t already, be sure to burn your RSS feed with Feedburner or Feedblitz to get your subscriber stats. Alternatively, you can just subscribe to your own feed in Google Reader and click on the View Details link. It will show you how many subscribers you have in the Google Reader system.
Posts and Guest Posts – The number of posts you do on your site and on other sites can have a huge effect on your blog’s overall growth. Be sure to note both in your tracking spreadsheet – after several months you may notice a correlation between the growth and decline in your stats based on these numbers alone.
Twitter Followers and Following – Watch your Twitter community grow by using Twitter Counter. When you sign in with Twitter, you can see your follower and following stats for the last three months for free. You can tweet a message from their service to see up to six months of stats as well.
Klout – Connect your Twitter, Facebook, LinkedIn, blog, and other information to Klout to get an overall influence score which will take into account your activity on each network that you connect to their service. Influence is based on a number of metrics including the retweets, comments, likes, etc. you get on anything you share on your networks and can be a good indicator of whether you are growing your influence as your blog grows. If you’re not a fan of Klout, PeerIndex offers a similar scoring system.
Facebook Fans, Post Views, and Post Feedback – If you have a Facebook fan page, jump into your Insights (which can be found on the right sidebar when you’re logged in and viewing your page. You can view statistics for the number of Lifetime Likes (the number of fans who have liked your page), Post Views (the number of times people have viewed your fan page’s posts in their News Feed), and Post Feedback (the number of likes and comments made on updates to your page) during the date range specified. This will show you if your blog’s fan page is continuously growing in popularity and engagement.
YouTube Subscribers and Views – If you have a YouTube Channel, note your subscribers and total number of upload views to see if your videos are working with the YouTube audience and your own community.
Unique Visitors, Visits, Pageviews, and Bounce Rate – This is where your Google Analytics come into play. If you haven’t setup Google Analytics for your blog, I suggest you do so (assuming you have a blog on its own domain or are using a platform that allows you to include your own analytics code). Each month, enter the above mentioned stats to see your blog’s progress as far as traffic and how well your traffic is staying on-site.
Google PageRank – It’s still back and forth in the SEO industry about the importance of PageRank, but as long as Google keeps updating it, I would consider it something important to note. Essentially it tells you your site’s authority based on the number and quality of backlinks your site has (you can see the correlation between the number of links and PageRank in this chart). You can grab your site’s PageRank by using the Google PageRank Checker site or SEO Site Tools extension for Google Chrome.
Domain Authority, Total Links, and Linking Root Domains – SEOmoz offers free access to Open Site Explorer, a tool that requires no registration to get the minimal details you need for this exercise, but you can register for a free account to get a bit more out it. Using their tool, you can grab your blog’s Domain Authority (predicts domain’s ranking potential based on algorithmic link metrics), Total Links (backlinks estimated by their tool), and Linking Root Domains (unique domains linking to your blog). This will help you see your growth in terms of the number of sites linking to you, hopefully for your awesome content!
Keyword Rankings – If you haven’t already, think about the main keywords that you want your blog to rank for and check your ranking for those terms monthly. Be sure to get an unpersonalized search result by logging out of your Google Account and turning off any search history or personalization preferences in your search preferences. Alternatively, you can download Free Monitor for Google or create a free account at Authority Labs . First you will get a 30 day free trial of their pro account (no credit card information required) and if you don’t upgrade at the end of 30 days, you’ll be downgraded to a free account that tracks the rankings of ten keywords for one domain in Google, Yahoo, and Bing.
Notes – Finally, you will want to make notes about any significant things you did throughout the month that might have affected your numbers for that month like placing a major guest post, hosting a webinar, unfollowing a lot of people (or following a lot of people), attending a conference, or another potentially major action or event. This will help you down the road in identifying things that have helped or hurt your blog’s progress.

Your Blog’s Growth Measurement Spreadsheet

As I did with my affiliate marketing organizer, I thought I’d create a shareable version of this spreadsheet I use measure my blog’s growth on Google Docs.
Blog Growth Statistics
If you are signed into your Google account, simply use the File > Save option to save this spreadsheet to your documents and start filling it in with your information.
Excel and Open Office Versions
If you don’t have Google Docs, or would prefer to save it on your local machine, go to the Google Docs version and use the File > Download As to save it as your desired file type. I’d suggest Open Office or Excel if possible for functionality.

How Do You Measure Your Blog’s Growth

Do you use similar stats and programs to measure your blog’s growth regularly? What other stats will you add to your spreadsheet? Please share your thoughts in the comments!

21 Life Lessons from Steve Jobs

21 Life Lessons from Steve Jobs


Steve Jobs will be remembered as a digital visionary — the man who brought poetry to the microchip.
But before he was a legend, he was a person.
We can’t all be Steve Jobs, but we can all learn from his extraordinary life.

#1 Skate to Where the Puck is Going to Be

In 2007, Steve Jobs said, “There’s an old Wayne Gretzky quote that I love. ‘I skate to where the puck is going to be, not where it has been.’ And we’ve always tried to do that at Apple. Since the very, very beginning. And we always will.”
Steve’s ability to anticipate future trends helped Apple dominate now-burgeoning markets like digital music sales (through the iPod and iTunes Store).

#2 Accentuate the Positive

Steve started life out on the wrong foot. He was given up for adoption at birth.
Tough break? Young Jobs didn’t think so: he was thankful for his loving adoptive parents — who happened to live in Palo Alto, California (which would eventually become Silicon Valley).

#3 Learn from Others

In high school, Jobs attended lectures at a small computer technology company called Hewlett-Packard. Before turning 21, Steve had worked for both HP and Atari. He saw what these companies were doing and learned what he wanted to do differently with Apple.

#4 Start Early

Because Steve was still a sponge-brained teenager when he started working with computers, he learned quickly.
It also helps that he started Apple in his early 20’s: when he was still full of energy, fresh ideas, and not yet restrained by a family or career.

#5 College is Important…

At its best, higher education challenges us to make connections and solve problems.
Jobs credits a college calligraphy course for part of the Macintosh’s development:
“If I had never dropped in on that single course in college, the Mac would have never had multiple typefaces or proportionally spaced fonts.”

#6 …But it’s Not Necessary

Reed University was expensive and Jobs didn’t want to drain his parents’ savings. If Jobs hadn’t dropped out, he would have been a junior in 1975. He co-founded Apple Computer that year instead.
Steve Jobs Traveled to India

#7 Travel the World

The year before he founded Apple, Jobs journeyed to India. Travel has a way of broadening a person’s perspective and expanding their sense of what’s possible – good traits in an entrepreneur.

#8 Surround Yourself with Good People

Steve Jobs wasn’t a great computer engineer. Apple would have had no chance if Jobs was the only one building the computers. That’s why he recruited Steve Wozniak.
Through the years, Jobs’ companies have blossomed thanks to the brilliant people he’s brought on board – like Apple CEO Tim Cook and Pixar CCO (Chief Creative Officer) John Lasseter.

#9 Expect Greatness

People tend to rise to expectations.

#10 Fake it Before You Make it

In Apple’s early days, Steve recognized that Palo Alto, California was the epicenter of innovative computer technology. Steve wanted his company to be associated with this place – but Apple was still headquartered out of a garage in nearby Los Altos.
Jobs’ solution was to set up a PO Box in Palo Alto and hire a voice answering service. A potential client would get the impression that Apple was a big company in the heart of Silicon Valley – even though the truth was that it was still just two sweaty guys in a garage across town.

#11 Obstacles are meant to be Overcome


Jobs and Wozniak ran out of money while developing the first Apple computer. Instead of giving in, Jobs sold his van and Wozniak sold his graphing calculator. When there’s a will, there’s a way.

#12 Don’t Value Money

As CEO of Apple, Jobs earned $1 a year. Jobs wasn’t incentivized by his salary, but by his own unrelenting pursuit of excellence. (Then again, his expansive stock holdings may have been some incentive.)

#13 Value People

Jobs hired passionate people and cultivated exceptional company cultures at both Apple and Pixar – and their work speaks for itself.

#14 Take Risks

Jobs was willing to cannibalize his company’s products in the name of progress. Many CEOs would have been hesitant to develop the iPhone, knowing full well that it would help to make the iPod obsolete – but Jobs did it anyway (and took a big bite out of the lucrative mobile market).
Steve Jobs' turtleneck is a big part of his personal brand
Don’t be afraid to take risks. Especially smart ones.

#15 Create a Personal Brand

Steve Jobs was one of the first people to recognize the growing importance of personal brands in the Internet age. His black turtleneck is as instantly recognizable as the Apple logo.

#16 Have a Higher Purpose

Buddha said, “We are what we think. All that we are arises with our thoughts. With our thoughts, we make the world.”
Jobs has turned his vision into reality since he began practicing Buddhism in the 1970’s.

#17 Find the Right Partner

There is no more important decision in your life than the person you decide to share it with. Choose wisely (as Steve did), and you have a partner who will help see you through daily challenges.
#18 Jobs Fails Forward

#18 Fail Forward

Everybody fails. It’s how you respond to those failures that makes all the difference. In 1984, Steve Jobs was fired from Apple.
At Stanford’s 2005 commencement address, he had this to say about it:
“I didn’t see it then, but it turned out that getting fired from Apple was the best thing that could have ever happened to me. The heaviness of being successful was replaced by the lightness of being a beginner again, less sure about everything. It freed me to enter one of the most creative periods of my life.”

#19 Learn How to Take a Brick to the Head

More inspiring words from the Stanford speech:
“Sometimes life hits you in the head with a brick. Don’t lose faith. I’m convinced that the only thing that kept me going was that I loved what I did. You’ve got to find what you love. And that is as true for your work as it is for your lovers. Your work is going to fill a large part of your life, and the only way to be truly satisfied is to do what you believe is great work.”

#20 Remember You’ll be Dead Soon

“Remembering that I’ll be dead soon is the most important tool I’ve ever encountered to help me make the big choices in life. Because almost everything — all external expectations, all pride, all fear of embarrassment or failure – these things just fall away in the face of death, leaving only what is truly important.”
Our time on this earth is short. Let’s make it count.

#21 Put a Dent in the Universe

Jobs once said, “We’re here to put a dent in the universe. Otherwise, why else even be here?”
Having a higher purpose doesn’t just help you find success. It redefines the meaning of the word.

Ready to Redefine Success?

I’ll let Jobs have the last word:
“The only way to do great work is to love what you do. If you haven’t found it yet, keep looking. Don’t settle. As with all matters of the heart, you’ll know when you find it. And, like any great relationship, it just gets better and better as the years roll on. So keep looking until you find it. Don’t settle.”

ow I Get Over 100,000 Visitors a Month With Top List Articles


Below is an excerpt from Traffic Domination.
Traffic to me is the simplest thing on the planet. It is so dam easy. All you have to do is provide people with epic stuff and they will come & they will share.
I have created over 100 ‘top list’ type posts which have been viewed by millions. They are so popular and well received that they have been featured on Reddit Homepage, New York Times, Yahoo News & one even became a Trending Topic on Twitter! The best part… I can get these types of posts created for just $25. Let me teach you how.

Why Creating Lists Wins You Traffic

When you Google, think what you are typing in, lets say you are looking for a cure for a health problem. Just for example, you are going to type in Cure Acid Reflux. That’s a big search term. Same with anything else in the industry that people are trying to cure. Firstly you would be surprised how many people don’t name the article what people are searching for in Google. This blows my mind. Why are you calling your article something fancy and using words people don’t ever use, just to make yourself look smart. No one is typing that in Google, so you shouldn’t be naming your posts that.
I’m no SEO expert, there I said it. But I do get around 200,000 visitors a month from Google alone so it’s kind of a big deal for me. Here’s what I believe: Google ranks sites which are naturally awesome. Forget everything about buying links and social love. Just imagine that your posts are so cool, people spend ages on your site and people love to share your stuff. That’s what GOOGLE wants! Great content because they are in the content industry. There job is to provide users with the right content and the best possible option, if yours is not that, then you don’t rank so well.
Back to my health post, I will call it :
10 Ways To Cure Acid Reflux
Somewhere I heard that odd numbers work better for open rates and marketing so I often will change the 10 for 7, 11, 13, 17 basically any odd number that looks good. I will decide how many I want before I even create the post.
But lets look at those silly people I love that make my life easy when I try to out rank their articles because they name their articles something stupid, for example:
Surefire Ways To Eradicate Acid Reflux
Are you freaking kidding me. I’m sure some idiot will type in Eradicate Acid Reflux every month or two but Surefire Ways? No Way!
You think this is an extreme example? Heck no, this is a nice example.

Tip 1. Name Your Posts Something People Search For!

Here’s where top lists dominate:
  • Firstly, they are quite long so people tend to spend a while reading them.
  • Each part is in section, for example, our Cure Acid Reflux post, its 7 cures, so we have 7 headlines with each option. Because of this, people can quickly decide YES, there’s something here I am willing to do, so I will read it all. I think a lot of articles don’t do well because people are not prepared to commit time to read a page if they don’t think it’s going to help them.
  • The title says exactly what you get, so you know what you are getting into.
  • When shared on social media, again, people know what they are about to get. I swear, people will retweet and share stuff just because of the title, not even knowing if the article is good or not.

Step 1. To Dominating Any Industry

Post a crap load of top posts. That’s what I do, I show up in dozens of industry’s and just do the same old top list posts but for different industry’s. Here’s some examples:
IncomeDiary (Blogging/Make Money Industry)
  • Top 30 Most Influential People In Blogger
  • 10 Reasons Why It Rocks To Be a Internet Entrepreneur
  • 10 Christmas Gifts For Entrepreneurs
  • 17 Tips To Cure Bloggers Block
  • 20 Bloggers To Follow on Facebook
ExpertPhotography (Photography Industry)
  • Top 30 Most Influential People In Photography
  • 10 Reasons Why It Rocks To be a Photographer
  • 10 Christmas Gifts For Photographers
  • 17 Tips To Fix Bad Photos
  • 20 Photographers To Follow on Facebook
WhyamIUnhealthy (Health Industry)
  • Top 30 Most Influential People in Natural Health
  • 10 Reasons Why It Rocks To Be Healthy
  • 10 Christmas Gifts for Super Healthy People
  • 17 Tips To Cure Acid Reflux
  • 20 Health Experts To Follow on Facebook
Retireat21 (Young Entrepreneur Industry)
  • Top 30 Most Influential Young Entrepreneurs
  • 10 Reasons Why It Rocks To Be a Young Entrepreneur
  • 10 Christmas Gifts For Young Entrepreneurs
  • 17 Tips To Stop People Treating You Different Because Of Your Age
  • 20 Young Entrepreneurs To Follow On Facebook
Are you getting the gist yet?
And it doesn’t stop there. Each post can be done in so many other ways. For example:
10 Reasons Why It Rocks To Be a Photographer… you could flip this on it’s head and do 10 Reasons Why It Sucks….

Tip 2. Turn One Top List Into a Series of Top Lists

Remember our post suggestion: 20 Bloggers To Follow on Facebook
How about doing that with every social network:
  • 20 Bloggers To Follow on Twitter
  • 20 Bloggers To Follow on Youtube
  • 20 Bloggers To Follow on Pinterest
  • 20 Bloggers To Follow on Google+
Instead of doing a post such as “20 Ways To Improve Your Website” – you could split it into a series and niche each one down, so for example:
  • 10 Ways To Improve Your Websites Load Time
  • 10 Ways To Improve Your Websites Useability
  • 10 Ways To Improve Your Websites Blog Layout
  • 10 Ways To Improve your Websites Conversion Rate

Step 2. Getting Articles Created (20 at a time)

So in order to achieve great success with my blogs, I need a crap load of content…. by doing basically no actual work. Want to know how I get articles written for $25 with a 24 hour turn around period, 20 at a time.
Just to confirm. I pay $25 for each article, I often buy 20 at a time and each article only takes 24 hours and can be written by thousands of different authors. The best thing is, if I don’t like it, I either get them to edit it or I can refuse to pay for it. Incredible?!?!!

33 Common Online Struggles from Last Week’s Experiment

33 Common Online Struggles from Last Week’s Experiment


The point of that post was two-fold. One, to interact with you on an individual level. Two, to better understand how I can help you with your website right now.
All of your struggles seem to fall into one of six categories: setting up your website, creating content, getting traffic, converting traffic, making money, or remaining true to foundations of internet success.
With that, here are 33 common online struggles and my best advice for handling each.

Setting up Your Website

Most of you seemed to have your sites set up, self-hosted, and otherwise running properly, which is great. There are still a few common problems that I saw.

1. Who is this site for and why does it exist?

If the homepage doesn’t answer this question immediately, people are likely to leave.  Communicate this with your logo, tagline, header area, or featured area.
Michael answers these two questions with his 5-word tagline, “How Pros Make Money Online.”

2. Creating a Custom Blog Design

If you haven’t at least upgraded to a premium theme, I would start there. Spend $50-$100 and your site will look drastically better. Michael started Income Diary with a $70 WooThemes template. Within a few months, he paid someone to update it.
Custom blog designs start at $1,000 and run up to $100,000 or more.

3. Cleaning Up the Blog Design

If you have a logo or an opt-in box, make sure it matches the colors in the design. If you include post images, make sure they’re all exactly the same size (here it’s 345 pixels by 180 pixels). If you start adding widgets to the sidebar/footer, make sure you can answer the question, “how does this improve the site for my readers?”
Simply using colors that match is a great start. You can find matching color schemes with ColorSchemeGenerator.com.

 4. Blog Excerpts vs. Full Articles

All major news sites and big-time blogs, with the exception of a few, feature post excerpts on the homepage. They do this to make their content more consumable and to help people find what they’re looking for. Plus, it makes the scroll bar smaller.
To enable homepage post excerpts within WordPress, put the Read More tag at the end of your excerpt.

Some premium themes automatically create and show post excerpts on your blog page.

5. Choosing from a Sea of Plugins

Before you start adding every five-star plugin that might improve your site, you need to understand that plugins are little pieces of software. Once you install more than 5-10 of them, there’s a good chance that they’ll conflict with one another, which could crash your site.
The only plugins that are absolutely necessary are Akismet, Google XML Sitemaps, Contact Form 7 (free) or Gravity Forms (premium), and WordPress SEO by Yoast (unless your theme has SEO options built-in).

Creating Content

After getting your site set up, the next step is writing content. All of us can improve on this.

6. Writing Well

Writing is like painting. Anyone can pick up a paintbrush and make a few strokes, but it’s immediately obvious when you can’t do it well.
Simply writing content without spelling or grammar mistakes doesn’t make it good.
If you don’t have a command of the English language, you have three options: become a better at writing in English, hire a writer, or write in your native language. Even those of us who speak primarily English need to work on this, a lot.

7. Creating Exceptional Content

Exceptional content talks about things that people are actually interested in. It educates and entertains. Most importantly, it uniquely solves a problem.
If you tell me that your content is exceptional, yet you’re not seeing the results, your content isn’t exceptional.

8. Crafting Headlines

The headline is the most important part of your post. If it’s bad, no one will notice it, click it, or read it.
To write better headlines, make sure they are keyword-focused, benefit-driven, and power-word ridden. In the eight hours I spent on your sites, I saw less than a handful of good headlines.

9. Writing Audience-Focused Content

People expect blogs to be flooded with useful information that benefits the audience more than it documents the blogger’s life.
If you want to build an audience, focus on the audience.

10. Finding Motivation to Write Consistently

When you put a lot of work into something and don’t experience results right away, it’s demoralizing. You question why you’re doing all of this if no one is paying attention.
Two things. One, you’re definitely doing something wrong and you just need to figure out how to fix it. Two, this is the internet’s way of filtering the good from the bad. If it was easy, everyone would do it.
The people who find success online, without exception, dedicate years to figuring out the internet before they finally crack the formula.

11. Writing with a Busy Schedule

I’ll admit I haven’t found a good solution for this either. The posts I write here take 6-8 hours. If you have a full-time job, an attention-hungry kid, and a literally hungry family, I know it’s hard to find the time to write even once a week.
You have three options. One, write higher quality, less often. Two, find (probably hire) someone to create content for you. Three, find a way to accept and filter user-generated content.

12. User-Generated Content

If you can figure out how to accept user-generated content and maintain a high-level of quality, you’re golden.
Again, two things. One, tell your users exactly what you want them to submit. Two, make the submission process as smooth as possible.
If you use Gravity Forms, you can create a form that saves their submission as a draft in your “Posts” section of WordPress.

Getting Traffic

Getting traffic was the most common struggle online. Over half of you mentioned that you wanted more traffic.

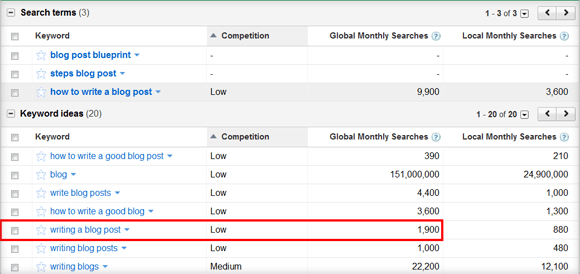
13. Ranking for the Right Keywords

If you want your site to rank for the right keywords, you need to create exceptional content for that keyword. Either that, or you’re going to be paying for traffic.

14. Building Backlinks

I’ve been running blogs since 2008 and I’ve never implemented a formal link-building campaign. Yet, between my two largest sites, I get 18,500 search visits per month which accounts for 56% of my traffic.
Backlinks are important, but not as important as creating exceptional content. Links come naturally.
I think the larger problem is that people would rather focus on building backlinks than creating exceptional content.

15. Optimizing Blog Posts

None of you mentioned that you struggle with optimizing blog posts, but I saw that this was an underlying problem to why you’re not getting traffic.
To help you with that, here are 10 SEO Blog Post Publishing Steps that Most Bloggers Forget and 10 Blog Post Marketing Steps to Take Immediately After You Publish.

16. Encouraging People to Share Your Content

If you’re not creating content worth sharing, people aren’t going to share it.
Again, it all comes back to creating exceptional content. If you’re doing that, they’ll find a way to share it.

17. Boosting Page Views by Keeping People on Your Site

To boost engagement, get people to consume as much of your content as possible. If I read seven blog posts on any one site, then I’ll probably become a regular reader.
To increase the likelihood of somebody staying on your site, add a Related Posts area to your blog post footer. For this, I use the Similar Posts plugin.

Converting Traffic

Once you get people to your site, focus on encouraging them to do something. It could be to subscribe, to buy, or even just to comment.

18. Creating an Opt-In Bonus

To create your opt-in bonus, the first step is figuring out what readers want. If they have a specific set of problems that you can help them with, write an ebook, create a video series, or set up an auto-responder.
The software-as-a-service equivalent is a free trial. Very few sites find success without first giving something away for free.

19. Getting More Email Subscribers

The first step in getting more email subscribers is to give them a great reason to subscribe, oftentimes with an opt-in bonus.
Once you have a compelling reason for getting someone to subscribe, then it’s as simple as constantly reminding them to do so in a way that communicates the benefit of subscribing.

20. Positioning Your Opt-Ins

The most popular places to put opt-ins are in the header, at the top of the sidebar, at the bottom of the post, and in the footer. Of course, Popup Domination works so well because it makes the opt-in front-and-center.
One location that IncomeDiary.com used to utilize and is beginning to pick up steam on other sites is above the content and sidebars on the homepage.

21. Designing Your Opt-Ins

Using the Aweber/MailChimp-generated opt-in templates is a good start, but they don’t fit in with the rest of your design. It looks sloppy and makes people think that your bonus/newsletter is subpar.
If you know HTML and CSS, you can strip out the auto-generated styling and style them however you want. Explaining this in more detail is outside the scope of this article, but if you need help, drop a comment and I’ll see what I can do.

22. Building a Community

Building a community is a process that starts with earning one reader at a time. Get someone to read one post. Then another, and another, and another. They’ll subscribe, open your emails, leave comments, and share your stuff.
Then someone else will come along and the two of them will start recognizing each other in the comments. Then another will come, and another, and another.
But it starts with one reader reading one post and thinking, “That was worth my time. What else is here?”

Making Money

If you’re doing everything right up to this point, it’s time to cash in, but in a way that doesn’t detract from the work you’ve already done.

23. Ethics of Making Money Online

It’s not wrong to start forming a business around helping people with their problems. That’s what businesses do.
If you’re not making money nor independently wealthy, then the only way your blog can be sustainable is if you start selling things to your audience.
I understand the hesitancy to start making money online because it feels like you’re exploiting the very people that you’re trying to help. The best way to overcome this hesitancy is to only sell them things that they need.
The more niche your audience, the more easily you’ll be able to recommend products and show ads that’ll fit their needs.

24. Making Ads More Relevant

Click-through rates depend on the relevancy of the ads.
If you have a news-based or humor-based site that appeals to everyone, it’s going to be difficult to serve them relevant ads. If you focus on building an audience of a specific type of person, you won’t get as much traffic, but advertisers will pay more for that traffic because it’s targeted.

25. Positioning Ads to Increase Clicks

I’m not a fan of trying to trick people into clicking your ads. It’s a short-term game that’s not worth playing.
But if your ads are relevant enough to actually help people, then put them in the same places you would put your opt-ins (header, top sidebar, bottom post, footer).

26. Focusing on Affiliate Sales

Quick rule: Don’t recommend something that you haven’t used and benefited from using yourself.
Let’s say that you’re building an audience of people like you. If a product helps you, it’ll help them. If it has an affiliate program, sign up and recommend it. You can create full-scale reviews or simply drop it into your posts and emails when it’s relevant.
Recommend a mix of products with and without affiliate programs. That’ll show people that you’re there to help, not just to make a buck.

27. Coming up with Product Ideas

Ask your audience what they want.
Organize information into an ebook. Develop software that helps you and package it to help them. Launch a premium course to help them individually.
The neat thing about building an audience first is that they’ll tell you what they want and you have a platform to sell it.

28. Sales Page Strategy

The rules here are constantly being rewritten.
If you create something that people need and you effectively communicate the reasons why they need it, they will buy it. If they don’t buy it, you made a mistake on one of those first two things.

Foundations of Success Online

In terms of building a website, getting traffic, converting traffic, and making money, success is simply a matter of doing the right things in the right order. It’s easy once you know how to do it.
The more challenging part is getting the fundamentals right. If you don’t do these five things, you will struggle at every other level.

29. Help People Solve Problems

If your website doesn’t help specific people solve specific problems, it’s not going to get the attention that it deserves. And even if it does, it’s going to be difficult to sell things to those people.

30. Be Unique in a Crowded Internet

Most sites are average.
If you want to stick out, be different. If you want to be remarkable, be memorable. If you want to make waves, create something that you’re proud to show to your real-life friends.
Too many of us have template-y designs, generic logos, auto-generated opt-ins, and regurgitated content.
Be unique.

31. Get Past the Desire for Anonymity

I know that many of you choose to be anonymous because the internet makes that possible. Maybe it lets you be more honest with your advice. Or maybe you justify it with, “this site isn’t about me.”
But it’s like walking into a sales meeting with a mask on. Sure, it’ll be interesting for a few minutes, but if you never take the mask off, they’re going to walk out.
People buy from people they know, like, and trust.

32. Avoid Paralysis from the Pursuit for Perfection

One month on the design, two on the logo, a few months of market research, and many, many months crafting an amazing opt-in bonus. Now, just a few weeks to write the first five blog posts and bam! Site’s live.
Nobody comes.
I know, the gradient in the nav menu is all wrong. Just a few weeks to fix that. Might as well re-work the footer too. Another month goes by.
Nobody comes.
Maybe something’s wrong with my color scheme…
A year later. You cracked the 1,000 uniques mark in the 11th month, but your site never picked up steam like you planned for it to.
Just get your site up, track data, and adjust your site based on feedback. Then, never stop improving.

33. Stick with One Project

Results are going to take longer than you expect, especially if you’re just getting started online.
If you move around from shiny object to shiny object every three months, none of your projects are going to get the attention that they need.
Like I said, if you have the fundamentals right, it’s only a matter of doing the other 28 things in this list. It’ll take time, more time than you want it to, but it will happen.

The Last Word

I learned a lot about you all last week. What you struggle with. What you’re doing well. What you can improve. And I hope this post shed some light on your common struggles.
For us to continue serving you, we need you to continue telling us how we can help.
I appreciate the, “Awesome post, Nick! Way to go. You’re so smart (and handsome)” comments. I really do.
But I’d like more of you to challenge my thoughts. Give me feedback that’s scary to give. Tell me, “Nick, this concept is good in theory, but I’m really struggling to implement it because…”

10 Things to Do on Day One of Your Blog

A journey of a thousand miles begins with a single step.
That’s a quote by the Chinese philosopher Laozi and it’s particularly relevant to new bloggers. That first step is the most important one, but what does it entail?
Let’s say you bought a domain, set up hosting, and installed WordPress. What comes next? How do you start blogging with the end in mind? Here are ten things you should do on day one of your blog (or today, if you’re past day one).

Let’s Assume You’ve Done Your Research

Before you purchase a domain, there a number of things you need to consider. For the sake of this article, we’re going to assume that you already:
  1. Chose a specific audience with problems that you know how to solve.
    Always start with an audience, not a topic. Choose to help people that you are qualified to help.
  2. Found and subscribed to the top related blogs in your niche.
    Use the How to Get Bloggers to See and Follow Your Blog post to find out how to find other bloggers in your niche. Then subscribe to their feed and start following their posts.
  3. Read free posts, ebooks, and resources from your niche.
    Once you’re subscribed, spend a few days reading the free posts and ebooks they give you. Read both for the content and to see how they do what they do.
If you’d like more of my thoughts on any of these steps, let me know in the comments.

Technical Tasks for Your Blog

Here are five technical components of your blog that you need to take care of prior to writing a single post.

1. Burn Blog with FeedBurner

Every major blog that I can think of, including Copyblogger, Problogger, TechCrunch, and Mashable, all serve up their RSS feeds through the Google-acquired tool, FeedBurner. It’s become the industry standard because it’s by Google, it integrates with other software, and it’s been around for a long time.
To burn your blog with FeedBurner:
  1. Go to feedburner.com.
  2. Sign in with your Google account.
  3. Burn your feed by plopping your url in the box.
  4. Click next.
  5. Select your feed. It should be domain.com/feed if you’re using WordPress.
If you were wondering how Michael integrates his RSS feed with Aweber, this is the first step in that process. Even if you’ve been blogging for awhile, it’s important to do this as soon as possible so all of your subscribers reside under one roof.

2. Place Opt-In Forms

The money is in the list … If I could do one thing differently, I would have started building my list earlier … The most important call to action for bloggers is to encourage people to subscribe.
You’ve heard all of that countless times. You can’t start building your list until your site has opt-in forms.
No matter which email platform you use (even FeedBurner has an email subscriber option), the process of putting opt-in forms on your site is, in most cases, a matter of copy/pasting the code. Here are a few places to put those forms:
  1. Right side of the header.
  2. Top of the sidebar.
  3. Bottom of posts.
  4. Footer area.
  5. Featured on the homepage.
  6. Lightbox with Popup Domination.

3. Write Your About Page

Your about page will be one of the most viewed pages on your site because readers like to know the people behind the site.
I was listening to a Derek Halpern interview on Smart Passive Income the other day, and this was Derek’s advice on how you should organize your about page:
  1. What will this website do for the visitor? Followed by an opt-in box.
  2. Establish yourself as an expert. Followed by an opt-in box.
  3. Build a personal connection with your story. Finish it up with an opt-in box.
Treat your about page as a sales letter for why somebody should follow you and your site. If you do a good job, they’ll want more information from you, hence the opt-in.

4. Create a Contact Page

Once you have an about page, the only other page you need to launch your blog is a contact page. I include two things on my contact page:
  1. Contact information.
    I list my email, Skype ID, Twitter, LinkedIn, Facebook, and Google Plus.
  2. Contact form.
    Sometimes people prefer to email you directly from the site. Include a contact form by using the Contact Form 7 and Really Simple CAPTCHA plugins.

Planning Content for Your Blog

Once you have the technical components of your blog worked out, it’s time to focus on the most important part, the content.

5. Choose Your Categories

Within WordPress, you create categories for your posts. These categories help organize your site both for your readers and for search engines.
Category pages display your archived posts based on the category you choose.
To set up your category pages, go to Posts > Categories and be sure to include your meta data as well as an introductory headline/content.

6. Pick Your Pillar Articles

After you create the category pages, think about how you can create a pillar article for each category.
A pillar article is different than a category page in that it’s an ultimate resource post (i.e. 101 Ways to Make Money Online) with links to your in-depth articles.
These posts get lots of traffic. You can even create a secondary navigation menu, like the one on Income Diary, to highlight the pillar articles on your blog.

7. Brainstorm a List of Blog Posts

Once you’ve chosen your categories and pillars, start brainstorming different posts that solve problems and fit within the scope of those categories. I like to brainstorm with a notebook and a white board.
To aid in and filter down this brainstormed list, do a little keyword research to figure out which keywords and blog post topics people are searching for.
You’ll use this brainstormed list to create your editorial calendar.

8. Create an Editorial Calendar

An editorial calendar is a fancy term for planning which blog posts you’re going to write and publish on which days.
You can simply schedule your blog posts in a planner/calendar. If you’d like to take this process to the next level, you can use the Editorial Calendar plugin.
This step isn’t necessary but it will keep you focused and on schedule for creating content for your blog.

9. Write a Ton of Posts

One of the biggest mistakes that new bloggers make is that the start telling people about their blog when they only have a few posts written. As soon as you start telling people about it, you have a responsibility to keep it updated.
Based on how seriously you want to take your blog, this is how many blog posts you need to write prior to publishing the first post:
  1. Recreational Blogger: 5 posts
    If you’re testing the blogging waters, start with writing 5 posts. Publish the first three, tell people about them, and schedule the next two.
  2. Intermediate Blogger: 10 posts
    If you’re fairly certain you want to keep up with blogging, write 10 posts to see if it’s something that you enjoy doing.
  3. Serious Blogger: 20 posts
    If you’re blogging to better your business, start by writing 20 posts.
  4. Career Blogger: 50 posts
    If blogging is your business, write 50 posts before you tell anyone. As soon as you launch, it’s going to be tough to keep up with a rigorous posting schedule. It’ll be nice to have a couple dozen posts sitting in the queue.
If you’ve already launched your blog, there’s a good chance your posting schedule has waned since the first few months. Consider taking a hiatus so you can build up a stockpile of focused content and re-launch it in a few months.

10. Strategize Your Funnel System

Man, you’ve had a busy day. The final thing you need to figure out before you start telling people about your new blog is your funnel system.
The first step in developing your funnel system is figuring out what you want people to do. Maybe it’s to become a subscriber or purchase a product. This is the goal of your site.
Whether your goal is to get them to subscribe or to purchase, I think your funnel system should be the same:
Read > Subscribe > Free Report/Auto-Responder Series > Blog Post Broadcast > Purchase
Getting somebody to purchase something from your site is like asking them to marry you. You can’t pop the question right away. You need to start by getting their phone number or email. Begin building trust by hanging out with them, giving them free content. After awhile, you’ll be in a relationship. Then one day they’ll trust you enough to buy.

The Final Word

I have a feeling that you’re past day one on your blog. That’s ok. These things still matter. Even if you’ve been blogging for years, these tips will help revitalize your blogging as though it’s day one all over again.
Sometimes it’s nice to go back to day one. You were probably pretty excited about what you’re doing now. Keep up that enthusiasm and let me know how I can help.

24 Rules I Follow When Creating Successful Websites

24 Rules I Follow When Creating Successful Websites


Today I wanted to do an extended list of my rules for creating and building a successful website. It is not my usual Top 7 list but there are so many key points here – ones that are often overlooked in a start-up website that I wanted to emphasis them all. For simplicity I am not going to do a detailed explanation of every Rule – because in many cases these rules are REMINDERS rather than new information for a lot of my readership. That said, if you have a specific question or don’t understand the reasoning please do post a question in the comments. Actually, I’d like to give you a challenge – let me know any Key Rules you feel I have missed out on in this post in the comments below.
Lets get started!
1 Your website should load quickly. (Because Google loves it!) Watch out for memory intensive plugins or conflicting plugins etc.
2 Security from hackers is important. I lost my first big site because I didn’t have any. More embarrassingly I didn’t have a Back Up! Fortunately these days, most hosts will do automatic backups for you (although I believe you should always keep a fairly up to-date back-up of your site offline also) Additionally never pick a web host that hasn’t got 24/7 live support. When things go BAD, you will want their help. I use HostGator.com for most of my blogs – great back up and first class security. Highly recommended.
3 Always use a .com and unless there really is no alternative don’t use a DASH / Hyphen in between words in a domain name.
4 Build an email list from day one. Go get Popup Domination.
5 Websites do break! Sometimes for what will appear no reason, pages will stop displaying as they should or even links will get messed up. This could be because of some conflict with some of the Plugins. Especially when upgrading say WordPress know that some of the Plugins you have installed will no longer be compatible. With regards to internal and external links there are various Broken Link Checkers, some of them FREE that are worth checking out.
6 Facebook, Twitter & pinterest.com. Pick one and dominate it, stop sucking at all 3. Or alternatively hire someone to look after your social media and make them responsible for the outcome.
7 Have a plan for your business (website) – I mean a bricks and mortar business without a business plan is pretty silly! Why should it be any different for your website? Have a plan for the coming month, 3 month, 6 months, 12 months! Where do you see you and your website 5 years from now? Do you have an exit plan? Do you have a revenue plan?
“By failing to prepare, you are preparing to fail.”
~ Benjamin Franklin
8 If you focus on one traffic source, you are dumb. Google, Social Media, Email Marketing, Podcasts/Videos, Info Graphics & Linkbait are all important.
9 Consistency is key when publishing content. Daily, Weekly, Monthly, you choose how often to post and stick to it. (Gee, I am not always great at following this Rule myself – but really it is essential!)
“It’s not what we do once in a while that shapes our lives. It’s what we do consistently.”
~ Anthony Robbins
10 Make it easy for people to contact you. What is more, be open to some criticism or less than positive comments about your website. Sure some comments will come from generally negative people but my overall experience is that people want to help. For example I have received 100′s of emails from people notifying me of bugs and spelling errors.
11 Never tell people what you plan to do, do it, then show them. That is my preferred approach – I know many will suggest you tell people what you are going to do – as it puts additional pressure on you to do it. If you think that works better for you, then feel free to ignore this ‘rule’.
12 Never retaliate to comments or emails. People will disagree with you and you might even think they are dumb, but they are entitled to their opinion. Frankly we don’t have the time or energy to prove them wrong. It’s also not so important that you need to waste your life trying to prove yourself right and someone else wrong.
This is one of my fathers favorite quotes – not everyone will get it first time, but think about it!
“Do you want to be Right or do you want to be Happy”
13 Ask! You can get a lot of things by just asking. When I was 18, I caught Glandular Fever in Ghana and spent a horrific week in hospital in Ghana before returning to England and spending a week in hospital here in the UK. I had to rest for months after that and decided I had nothing better to do then ask people to do interviews for Retireat21. I spent days emailing hundreds of top internet entrepreneurs for interviews. Three of the top 100 websites in the world came back to me and say they would do an interview, plus over 50 other successful CEO’s and entrepreneurs.
14 Regularly ask yourself – If in 10 years( or in one day, 6 months. I year, 5 years)  you were to look back at your actions today what would you have changed? Do that. From my good friend Craig Ballantyne
15 These days there is an increasing trend that the people who make the most cash online, buy a high percentage of their traffic (pay for advertisements). Basically they have learned additional skills based on lead generation and Cost Per Acquisition (CPA). If you are not also learning these skills, you are missing out. I now include bought traffic in my online promotions.
16 Top list articles still bring me 80% of my traffic although it took only 20% of my time to create them.
17 In my experience, it’s easier to start a day productively then end it productively. (Well… so far today I’ve done jackshit, I guess I will try harder tomorrow..)
18 Invest in the future. Don’t presume what you are doing right now, will be working in years to come. Keep innovating & educating.
19 Surround yourself with successful people. Retireat21, IncomeDiary & Popup Domination all came from ‘hanging out’ with other like minded people.
20 Always have a written and signed agreement with your partners / Joint Ventures. People will rip you off for less money then you would imagine. Greed is a crazy thing.
21 What you Focus on is what you get – so if you want money, FOCUS on it! Always be aware of who owes you money, check that the payments you expect to receive are arriving in your bank account (Paypal account) at the correct time. If you still get paid by a cheque – bank it straight away and don’t leave it hanging around for days. Basically without getting too metaphysical or ‘woo woo’ on you I believe the Universe rewards your intent – also known as the Law Of Attraction.
22 Don’t be afraid of highly competitive niche! The reason they are competitive is because there is money in that niche!
23 When negotiating, often it is more powerful to say nothing. I find that people don’t like silence and will want to say something, often lowering the price.
24 Keep moving forward. Don’t give up – The biggest difference between success and failure is not giving up.
“Our greatest weakness lies in giving up. The most certain way to succeed is always to try just one more time”
~ Thomas Edison
“The difference between greatness and mediocrity is often how an individual views a mistake.”
~ Nelson Boswell

30 Websites That Make A Lot Of Money Online


Top Earning Websites

Today I created a list of the top 30 earning websites in the world, for some of these websites, $50 million in revenue a day is just a typical day, crazy isn’t it? And it was all created in the last 10 or so years! I usually would do a write up about how the list rocks and why you should do it to but I think the figures speak for themselves, enjoy!
Since publishing this article, we have done an updated version called ‘20 Websites Making The Most Money‘.
Before you see the list, who do you think makes the most money? Decided? Ok, now you can look!
top-30-earning-sites

30 Websites That Make A Lot Of Money Online

 Rank  Website  Founders  Annual Revenue  Per Second
 1  Google  Larry Page and Sergey Brin  $21,800,000,000  $691.27
 2  Amazon  Jeff Bezos  $19,166,000,000  $607.75
 3  Yahoo  Jerry Yang and David Filo  $7,200,000,000  $228.31
 4  eBay  Pierre Omidyar  $6,290,000,000  $199.45
 5  MSN/Live  Nathan Myhrvold.  $3,214,000,000  $101.92
 6  PayPal  Max Levchin, Peter Thiel, and Luke Nosek  $2,250,000,000  $71.35
 7  iTunes  Jeff Robbin  $1,900,000,000  $60.25
 8  Reuters  Marshal Vace  $1,892,000,000  $59.99
 9  Priceline  Jesse Fink  $1,884,000,000  $59.74
 10  Expedia  Added Mark Schroeder  $1,447,000,000  $45.88
 11  NetFlix  Reed Hastings  $1,200,000,000  $38.05
 12  Travelocity  Terry Jones  $1,100,000,000  $38.05
 13  Zappos  Nick Swinmurn  $1,000,000,000  $31.71
 14  Hotels.com  David Litman  $1,000,000,000  $31.71
 15  AOL  Erik Prince  $968,000,000  $30.70
 16  Orbitz  Jeff Katz  $870,000,000  $27.59
 17  Overstock  Robert Brazell  $834,000,000  $26.45
 18  MySpace  Tom Anderson  $800,000,000  $25.37
 19  Skype  Niklas Zennstrom  $550,841,000  $17.47
 20  Sohu  Zhang Chaoyang  $429,000,000  $13.60
 21  Buy.com  Robb Brock  $400,000,000  $12.68
 22  StubHub  Eric Baker  $400,000,000  $12.68
 23  Alibaba  Jack Ma  $316,000,000  $10.02
 24  Facebook  Mark Zuckerberg  $300,000,000  $9.51
 25  YouTube  Chad Hurley, Steve Chen and Jawed Karim  $300,000,000  $9.51
 26  Blue Nile  Mark Vadon  $295,000,000  $9.35
 27  Tripadvisor  Stephen Kaufer  $260,000,000  $8.24
 28  Getty Images  Mark Getty  $233,200,000  $7.39
 29  Bidz  Garry Itkin  $207,000,000  $6.56
 30  NYTimes  Henry Jarvis Raymond  $175,000,000  $5.55